A well-tied tie can elevate a man’s look, exuding confidence and sophistication. Whether you’re attending a formal event, heading to the office, or simply want to add a touch of elegance to your everyday attire, mastering the art of tying a tie is a must.
This ultimate guide will take you through different types of knots, step-by-step instructions, and even explore trendy styles to help you become a knot-tying pro.
- Types of knots
- Four-in-hand knot
- Half-Windsor knot
- Step-by-step guide
- Bow tie
- Windsor knot
- Fishing knot
- Bow with ribbon
- Unique ways
Why you need to know how to tie a tie
Before delving into the various knots and styles, it’s important to understand why knowing how to tie a tie is crucial.
A tie is not just a piece of cloth. it’s a symbol of professionalism, elegance, and attention to detail. Whether you’re attending a business meeting, job interview, or formal occasion, a properly adjust tie can make a lasting impression.
It shows that you take pride in your appearance and have a keen eye for style. Plus, being able to adjust your own tie gives you the freedom to experiment with different knots and styles, allowing you to express your individuality and personal taste.
Different types of knots for tying a tie
There are numerous types of knots for tying a tie, each with its own unique characteristics and level of complexity.
Let’s explore how to guide:
The four-in-hand knot
The Four-in-hand knot is a classic and versatile knot that is suitable for most occasions. It is relatively easy to tie and has a slightly asymmetrical shape.
- To adjust your knot, start by crossing the wide end of the tie over the narrow end
- Then, bring the wide end underneath the narrow end and pull it through the loop
- Finally, pass the wide end through the knot in front and adjust it to achieve the desired length
The Half-Windsor knot
The Half-Windsor knot is a more formal knot that exudes elegance and sophistication. It is slightly larger than the Four-in-Hand knot and works well with medium-width ties.
- To adjust this knot, begin by crossing the wide end over the narrow end
- Then, bring the wide end up and pass it through the loop between the collar and the tie
- Next, bring the wide end down, pass it behind the narrow end, and bring it up through the loop
- Finally, adjust the knot by holding the narrow end and sliding the knot up to the collar

The Pratt knot
The Pratt knot, also known as the Shelby knot, is a symmetrical knot that is easy to tie and pairs well with most tie styles. It has a clean and polished look, making it suitable for both casual and formal occasions.
- To tie this knot, start by crossing the wide end over the narrow end
- Then, bring the wide end underneath the narrow end and pass it up through the loop
- Finally, bring the wide end down, pass it over the front of the knot, and pull it through the loop
Step-by-step guide
Now that you are familiar with different types of knots for your lifestyle, let’s dive into a step-by-step guide on tying a classic knot. The classic knot, also known as the Oriental knot or the Simple knot, is one of the most basic and widely used knots. It is simple to tie, has a triangular shape, and works well with most tie widths.
Follow these instructions to tie a classic knot:
- Start with the wide end of the tie on the right side and the narrow end on the left side. Ensure that the wide end is longer than the narrow end.
- Cross the wide end over the narrow end, forming an X shape at the collar.
- Bring the wide end underneath the narrow end and pull it up through the loop around your neck.
- Pull the wide end down through the front of the knot, forming a horizontal loop.
- Pass the wide end over the front of the knot from right to left.
- Bring the wide end up through the loop around your neck and pull it down through the horizontal loop.
- Adjust the knot by holding the narrow end and sliding the knot up to the collar. Tighten and straighten the knot as needed.
How to tie a bow tie
Bow ties are a timeless accessory that can instantly elevate your formal attire. Though they may seem intimidating to tie, with a little practice, you can master the art of tying a bow tie.
Follow these step-by-step instructions to tie a bow tie:
- Start with the bow tie draped around your neck, with the ends hanging down. Adjust the ends so that the right end is slightly longer than the left end.
- Cross the longer end over the shorter end, creating a simple knot just like tying your shoelaces.
- Take the longer end and fold it into a bow shape, forming a loop with the loose end hanging down.
- Hold the loop with your thumb and index finger, creating a small opening at the top.
- Take the shorter end and fold it horizontally, placing it across the loop you just created.
- Pass the longer end through the opening at the top, pulling it all the way through.
- Adjust the bow tie by holding the folded ends and pulling gently to tighten the knot. Straighten the bow tie and ensure that the ends are symmetrical.
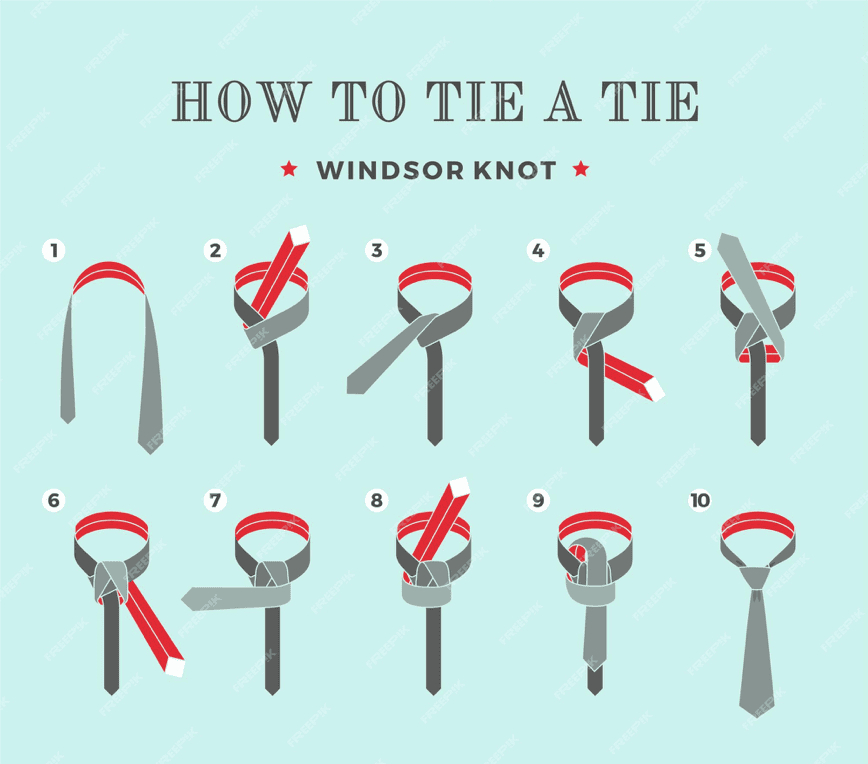
Mastering the Windsor knot
The Windsor knot is a powerful knot that exudes confidence and elegance. It is a wide, triangular knot that is best suited for spread collar shirts and wide ties.
Follow these steps to master the Windsor knot:
- Begin with the wide end of the tie on the right side and the narrow end on the left side. Ensure that the wide end is longer than the narrow end.
- Cross the wide end over the narrow end, forming an X shape at the collar.
- Bring the wide end up through the loop around your neck.
- Pass the wide end behind the narrow end from left to right.
- Bring the wide end up and pass it down through the loop around your neck.
- Bring the wide end over the front of the knot from right to left.
- Pass the wide end up through the loop around your neck one more time.
- Adjust the knot by holding the narrow end and sliding the knot up to the collar. Tighten and straighten the knot as needed.
How to tie a Fishing knot
While tying a tie is typically associated with neckwear, the art of knot tying extends beyond fashion. If you’re an outdoor enthusiast or enjoy fishing, knowing how to tie a fishing knot is a valuable skill. One of the most popular fishing knots is the improved clinch knot.
Here’s how to tie it:
- Begin by passing the end of the fishing line through the eye of the hook or lure.
- Double back and make five to seven wraps around the standing line.
- Pass the end of the line through the small loop formed just above the eye of the hook or lure.
- Then, pass the end of the line through the larger loop formed by the wraps.
- Moisten the knot and pull on the standing line to tighten the knot.
- Trim any excess line close to the knot with a pair of scissors.
- Test the knot by giving it a firm tug to ensure it is secure.
How to tie a bow with ribbon
Bows are not limited to neckties and bow ties, they can also be used to add a touch of elegance to gifts, hair accessories, and decorations.
If you’re looking to tie a bow with ribbon, follow these simple steps:
- Start by creating two loops with the ribbon, making sure that the left loop is smaller than the right loop.
- Cross the right loop over the left loop, forming an X shape.
- Bring the right loop underneath the left loop and pull it through the opening at the top.
- Pull both loops tightly, forming the base of the bow.
- Take the ends of the ribbon and bring them to the center, crossing them over each other.
- Fold one end of the ribbon over the center, creating a loop.
- Fold the other end of the ribbon over the center in the opposite direction, forming another loop.
- Insert one loop into the other, creating a bow. Adjust the loops and tails as needed to achieve the desired look.
Unique ways to tie a tie
While classic knots are timeless and elegant, sometimes it’s fun to experiment with unique tie styles to add a touch of individuality to your look.
Here are a few trendy tie styles to consider:
The Eldredge knot
The Eldredge knot is a complex knot that creates a mesmerizing design. It is best suited for special occasions or when you want to make a bold fashion statement. Tying the Eldredge knot requires several intricate steps, but the result is truly eye-catching.
The Trinity knot
The Trinity knot is a triangular knot that symbolizes eternity. It is a stylish and intricate knot that is sure to turn heads. While it may appear complicated, with practice, you can master the art of tying the Trinity knot.
The Cape knot
The Cape knot is a modern and asymmetrical knot that adds a touch of flair to your outfit. It is a versatile knot that works well with both casual and formal attire. The Cape knot is relatively simple to tie and can instantly elevate your style.

Elevate your style with these tie-tying techniques and explore the world of men’s fashion. Practice different knots and styles to find the perfect look for any occasion. Remember, a well-tied tie is an essential accessory for every gentleman.